🏷️ 𝙎𝙥𝙚𝙘𝙞𝙖𝙡 𝙋𝙧𝙞𝙘𝙚 | 5-in-1 Caulking Tool – Sealant Remover, Scraper & Silicone Smoother
🏷️ 𝙎𝙥𝙚𝙘𝙞𝙖𝙡 𝙋𝙧𝙞𝙘𝙚 | 5-in-1 Caulking Tool – Sealant Remover, Scraper & Silicone Smoother
BUNDLE & SAVE
Couldn't load pickup availability

🏷️ 𝙎𝙥𝙚𝙘𝙞𝙖𝙡 𝙋𝙧𝙞𝙘𝙚 | 5-in-1 Caulking Tool – Sealant Remover, Scraper & Silicone Smoother
Make Your Next Caulk Line Neater.
A handheld tool for removing old caulk, clearing residue and shaping fresh sealant along suitable joints.
 Product image unavailable.
Tired of Messy Caulk Lines?
Uneven edges, stubborn residue and untidy corners can make a kitchen or bathroom joint look unfinished.
 Problem image unavailable.
Remove, Reapply, Then Shape.
The image illustrates a worn joint before the work and a neater appearance after old material is removed and fresh sealant is shaped.

Comparison image unavailable.
Final appearance depends on surface preparation, sealant and application.
Use the Right Edge for Each Task.
The pictured metal edge lifts old caulk, the scraper helps clear residue, and the corner tip shapes a fresh bead.
 Feature image unavailable.
- Metal edge for old caulk
- Scraper for remaining residue
- Corner tip for fresh sealant
Practical Details, Clearly Shown.
See the metal scraping edge, molded grip grooves and finishing tip before starting your next caulking project.

Detail image unavailable.
Ready for a Cleaner-Looking Joint?
Return to the product options above to choose the available offer.
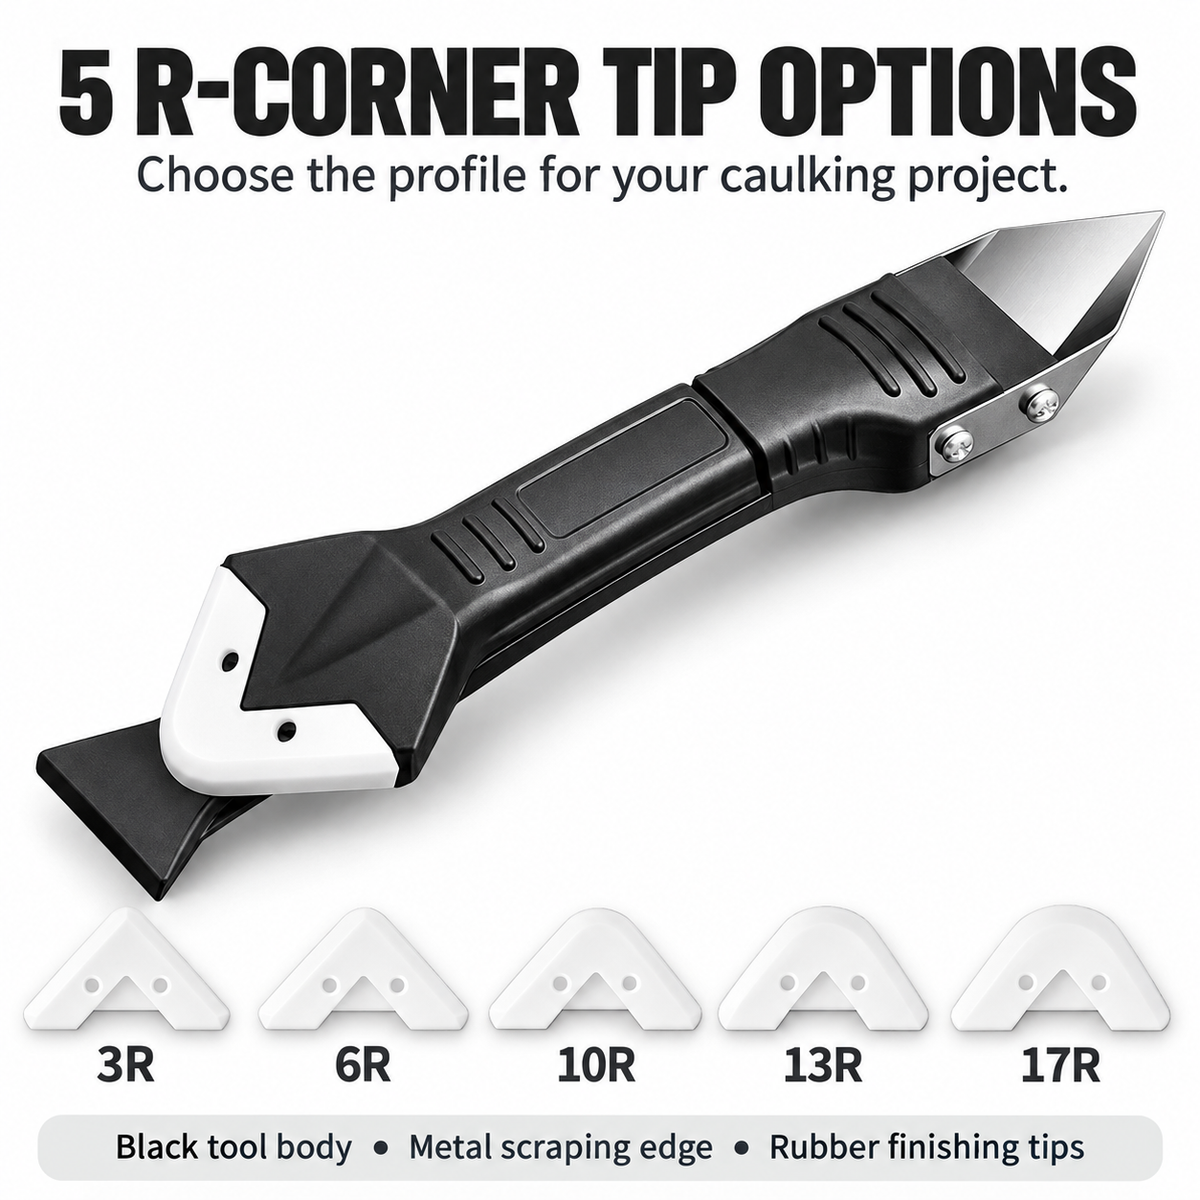
Find a Profile for the Joint.
The supplied image illustrates five rounded finishing profiles labeled 3R, 6R, 10R, 13R and 17R. Select a profile that suits your joint and the finish you want.

Profile image unavailable.
Your Next Caulking Project, Simplified.
Work through the joint in order: remove old material, clean and dry the area, apply sealant, then shape the new bead.

Instruction image unavailable.
Remove old caulk
Use the appropriate edge carefully along the existing joint.
Clean & dry
Clear residue and prepare the joint for fresh sealant.
Apply sealant
Apply your chosen caulk according to its own instructions.
Shape the bead
Guide a suitable finishing edge along the fresh joint.
Sealant is shown as a separate step; check the actual product listing for what is included in your order.
Make the Finishing Touch Yours.
Use the appropriate edge while working along suitable kitchen and bathroom caulk joints.
 Lifestyle image unavailable.
Frequently Asked Questions
Quick answers before you start your project.
The supplied images show edges for lifting old caulk, scraping remaining residue and shaping a newly applied sealant bead.
No. Fresh sealant is applied separately. The pictured tool is used for removal, scraping and finishing tasks.
Yes. The pictured sequence shows old material being removed and the joint cleaned and dried before fresh sealant is applied. Follow the instructions for your chosen sealant and surface.
The product image labels five rounded profiles: 3R, 6R, 10R, 13R and 17R. Confirm the exact included parts in the product purchase details.
Handle the edge carefully. Test on a small, less visible area if the surface may scratch, and follow the surface and sealant manufacturer's instructions.
Finish Your Caulking Project With More Control.
One handheld tool for the removal, scraping and finishing stages shown above.